Showing posts with label Scrapbooking. Show all posts
Tuesday, March 06, 2012
The Cheap Girl's Version of Album Embossing
I've really been trying to distract myself from this upcoming dental surgery so I decided to go through all my scrapbook albums and reorganize them. I had, at one time, tried to put them into some semblance of chronological order but had found it challenging to keep album sizes fairly standard. Some ended up quite thick while others were sparse. Then there was the problem of the children's pictures. Did I include them in the general yearly pics or try to put them in separate albums dedicated just to the children?
I finally decided to pull out all of my Thanksgiving and Christmas pictures and put those in separate scrapbooks. I also did separate albums for each child but kept general pictures with the kids in them in the yearly albums unless it was a significant event, such as a high school graduation. Those pics went in their own albums. Finally I created specialty albums such as wedding albums and heritage albums.
Well, now that I had those all reorganized, I decided to just start filling up the yearly albums and when one got to a good bulk, I'd switch to the next album, whether it meant combining years or not. I figured I'd identify these by embossing the spines, giving the date range. I was going to use Creative Memories' embossing service. In fact, I still had the box I had originally purchased years ago to send the album spines and/or covers off. Now I was finally going to do it. I pulled off all the spine covers and decided what I wanted to label them and then went online to see what the charge was going to be. Horror of horrors! I hadn't realized that they were only going to imprint the older-sized albums until the end of January 2012. All of my albums that needed imprinted were in this category and we were now into March. My window of opportunity was closed.
Well, I could have stopped right there and decided I would just forget embossing them. Or I could have decided to find a place in the area or on the Web that could do it for me, instead of Creative Memories. But in a moment of inspiration (some might call it insanity), I decided to label the albums myself. I grabbed some old pamphlets that I had about lettering, gathered some of my calligraphy pens, found a measuring tool and improvised for things to hold the spine covers flat.
I decided that I wanted all of my "labeling" to be at about the same height on the spine so that it would look nice and uniform when my albums were on the shelves. Another challenge was that I have different colored albums. One color of pen might not look so great or show up well on another color of album. I settled on a metallic silver pen for my main labeling.
I kept it pretty simple. I guess I could have stenciled the labels but frankly, I think the hand-done look adds to the charm and reflects the personality of the album maker. As I finished each spine, I stacked them on nearby surfaces and let them dry overnight.
After I'd do the initial labeling in the silver, I'd outline the letters in a fine-point permanent marker. Then I added a few little embellishments to finish the look.
For my holiday albums, I got a little more creative and drew a Christmas tree on the Christmas album and a pumpkin on the Thanksgiving album.
The end result? Well, I think they'll do just fine and even if they aren't as polished-looking as if they were done professionally, I can console myself with the fact that I saved myself about $14 an album......and that's a lot of consoling.
Now, I still have fifteen hours until my dental surgery. What can I get into next?
Tuesday, July 19, 2011
Any Day Now
We're in the final countdown until our second grandbaby arrives. It's the stage where we jump every time the phone rings. Could this be it? Are they on their way to the hospital? They don't have to worry about finding someone to watch little Mika since her Texas grandparents are right there, as are several aunts. The crib is assembled and a bag is semi-packed. We've reminded them to take a camera. So now we wait!
While we wait, I've been going through some boxes of old photographs. Today I found my old baby book. I had not been able to remember exactly how much I weighed when I was born when my son asked me the other day but this cleared up the mystery.
I had to chuckle as I looked through the book because it was not indicative of my mother's over-achieving nature. She had filled out very few pages. In fact, I found some pages where it was pretty obvious that I had filled out my own pages back when I was about 12-years old. How is this for an impressive life's ambition?
There are plenty of pages that I could still fill out in my "Log o' Life" book, which was cleverly designed to document a child's life from birth to the grave. There's even a page set aside for "Old Age Photo." Boy, you wouldn't dare market a baby book like this to Baby Boomers now. I just read an article today that said we don't even like to be called "Seniors."
Luckily, the newest little niblet due to arrive will have a Nana who loves to document life's events in pictures and commentary. With any luck, neither child will complain about a lack of documented memories sixty years from now.
Saturday, March 05, 2011
A Little Scrapbooking with Friends
The ingredients are right for a great weekend of scrapbooking fun. We have a nice room at a local hotel just set aside for three days of unlimited scrapbooking.
I've got good friends here to share the fun with. These retreats are always like big pajama parties. We stay up all hours of the night, laugh a lot, tell all sorts of tall tales and funny stories, and eat far too much.
Speaking of eating, we have a table in the back of the room that is loaded with snacks. That means that we can graze to our hearts' content. In addition, the hotel provides breakfast each morning and our scrapbooking hostess extraordinaire, Stephanie always provides delicious lunches and dinners for us.
I have unlimited coffee available to me AND a bottle of Diet Coke beside me (as well as some still in the cooler up in my room). The only thing that would make it even better would be a cappuccino machine in the lobby but hey, let's not be greedy.
I have my trusty laptop loaded with lots of digital scrapbooking software and my pictures. It all results in one thing - guaranteed fun! And I have the pictures to prove it!
Saturday, May 29, 2010
Creating Avatars with Storybook Creator
I promised you yesterday that I'd be posting how to make your own customized avatars. I'm sure that you can do these with just about most any photo editing program but I happen to use a Creative Memories scrapbooking program called Storybook Creator to do most of my avatar creating. I've put up a mosaic of some recent avatars that I created to give you an idea of some of the things you can do.
Here's what I do.
1. Go to Storybook Creator and click on "Create a New Project."
2. In the window that pops up, scroll down and choose on the left-hand side the words "Custom Size" under Local Printer.
3. It will then ask you to select a template. Your only choice will be one that is called "Blank." Choose that one and click the "Next" button.
4. A small window will pop up labeled Custom Page Size. "Units" should be defaulted to "inches." Under that, I want you to enter "3" for width and "3" for height. Leave everything else just the way it was when the window popped up. Click on "OK."
5. At the next pop-up window, you can add photos but I usually just do it when I'm actually working on my project so I click on the "Next" button.
6. The next pop-up window is going to ask you to name your project. Go ahead and name it whatever you want and then click on the "Create" button. Oh, yes. This window will also show you where it is going to save this project. Usually this is wherever you usually save the scrapbooking projects that you create but you don't really have to worry about it because you are going to be doing a different type of "save" later and you can choose where you want the avatar at that point.
7. Now you are in your work screen. I'm assuming at this point that you are familiar with working with Storybook Creator. If not, there are excellent tutorials on the Creative Memories website . Incidentally, the basic Storybook Creator software is available as a free download and if you go to the above website, you can find the link to the download. Anyway, back to what I was saying. In the work screen, you can now access all of your digital scrapbooking packages that you have loaded into Storybook Creator, including all the papers and embellishments. For example, if you look at the top row of the pictures above, at the one that says "Booklassie", that one was created solely with digital elements that I had loaded into Storybook Creator. I simply chose a paper background, added some embellishments, inserted some text boxes and that was it. If you want to use any photographs, just click on the Photos tab on the right side of the work area and then click on the "Get Photos" option. Then once you've imported photos over to Storybook Creator, you can place them into your avatar project as you wish, adding text boxes if you desire (and there are quite a few examples of that in the avatars displayed above).
8. When you have your avatar finished, click on the "Home" tab at the top of your screen and then click on the "Save" icon and click on "save" again in the drop down menu. This will save your avatar to your regular spot where your scrapbook projects are saved. I like to do this so that I can go back at any time and open it back up to rework it in Storybook Creator if I want to. But you aren't done yet. You still need to save it as a .jpg file. So now click once more on the "Save" icon and now click on "save pages as" from the drop down menu. A window will pop up and here is where you will be choosing what folder you want to save this .jpg file into. Also be sure that the "file type" says JPG File. Resolution should have defaulted to 300 dpi for "best quality" with a page size of 3 x 3 inches. It also should show that you are saving 1 page and the quality should be set on "Best." Once you've got this set, click on "Save."
9. At this point, you can close Storybook Creator. Now you are going to be resizing your project down to an avatar size with the help of this handy website. Go here and right at the center of your screen you will see the words "Upload a picture from your computer." Click on the Browse button and go to the folder where your avatar project is located. Select your avatar image (I do this in Vista by clicking on it and telling it to "open.") and then you should see the link show up in the little box. Now click on Upload. Your picture should show up in a new window.
10. Scroll down slightly and you'll see some choices of sizes. Pick the size that you want your avatar to be. Most web forums seem to prefer avatars that are 100 x 100. Now click on an area of your picture and drag your mouse to highlight the area that you want to be the avatar. Since you have already created the entire image to be an avatar and it's in a square shape, you should be able to just click on the top left corner and drag your mouse down to the bottom right corner and get pretty much the entire image selected. Now scroll down and just below where you picked the avatar size, you see the word "Save." Click on Save.
11. Your avatar has now been created and is shown in the small avatar size. At this point, click on the words "Open in new window" which are right under your avatar. In the new window, right-click on the image and choose "Save image as" and then choose where you want to save your newly created avatar on your computer.
That's it. You've got an avatar that you can upload wherever you want to use an avatar. Have fun creating your own unique images!
Project 365 - May 29, 2010 (Day 2)
Describing yarn that I'm listing for sale on Ravelry. Can't decide if I'm going to use the proceeds toward another spinning wheel or an iPad.
Saturday, April 17, 2010
Scrapping the Day Away
I haven't been on the internet today because I was off scrapbooking from 9 in the morning until 8 tonight. Can't remember if this was for National Scrapbooking Day or not but a large group of us all gathered in a hall and scrapped the day away. Here's my friend Linda working away. She had quite the day. Halfway through the day, her computer ran out of available space. So off she had to go to Best Buy and ended up with a Thumb Drive (is that what you call it) to put some of her storybooks on until she could get home later tonight to transfer them to her external hard drive.
When she finally got back, she began the process of transferring some of the things she had been working on over to the thumb drive to free up space on her laptop but suddenly, she got an error message. Turns out that she had completely filled up that flash drive as well. Poor kid! She just wasn't having any luck. Thank goodness that she had at least freed up enough space on her laptop that she could work on another set of digital pages until the end of our session. Oh, that's my friend, Karen, another convert to digital scrapbooking working away on her pages. There were three of us clustered together. We always enjoy the fact that we don't have to lug all the paper supplies and tools to these crops. All we need are our computers, power strips, and our imaginations. And if we get tired of working on digital scrapbooking, we can always take a break and play some games on our computers or just walk around and look at what others are working on. It's a great way to scrapbook.
Here's a graphic for you today. It's an old calling card that is actually an advertisement for a fellow who printed calling cards. It was in amongst my grandmother's old cards. The little card with his name was actually inside the little envelope but I took it out so it could be seen. The little hand with flower bouquet looked to be a sticker that was stuck on the little envelope. I'm guessing that it is from the late 1800's since most of the calling cards I have from my grandmother are ones she had as a young lady from that time frame.
Enjoy!
When she finally got back, she began the process of transferring some of the things she had been working on over to the thumb drive to free up space on her laptop but suddenly, she got an error message. Turns out that she had completely filled up that flash drive as well. Poor kid! She just wasn't having any luck. Thank goodness that she had at least freed up enough space on her laptop that she could work on another set of digital pages until the end of our session. Oh, that's my friend, Karen, another convert to digital scrapbooking working away on her pages. There were three of us clustered together. We always enjoy the fact that we don't have to lug all the paper supplies and tools to these crops. All we need are our computers, power strips, and our imaginations. And if we get tired of working on digital scrapbooking, we can always take a break and play some games on our computers or just walk around and look at what others are working on. It's a great way to scrapbook.
Throughout the day, they drew names for door prizes. Look what I won? A set of pages with pre-made borders. I still do some occasional pages the traditional way so I'll be able to use these or maybe I'll share them with my daughter. We both love that color of green. 
As always, we have a wonderful spread of food for lunch and for supper. Everyone brings snacks and desserts to share and food is brought in for our two meals. So we can snack all day long if we so desire. It's going to be bad news at my weigh-in at TOPS on Monday evening, I'm sure, although I really did try to avoid eating non-stop throughout the day. I managed to do pretty well, too but didn't do so well at resisting the toffee cookie bars. And drat, I made them so I knew how good they were, too. By the time we needed to pack up our supplies and head home, the weather had really turned cold. My, the wind was really whipping around and it felt more like early November than late April. What happened to our lovely warm Spring days?
Here's a graphic for you today. It's an old calling card that is actually an advertisement for a fellow who printed calling cards. It was in amongst my grandmother's old cards. The little card with his name was actually inside the little envelope but I took it out so it could be seen. The little hand with flower bouquet looked to be a sticker that was stuck on the little envelope. I'm guessing that it is from the late 1800's since most of the calling cards I have from my grandmother are ones she had as a young lady from that time frame.
Enjoy!
Thursday, April 08, 2010
Working with Commercial Digital Kits in Storybook Creator Plus
As much as I like Creative Memories products, their digital offerings haven't always been as appealing to me as I would like, although I must say that they are getting much better. Therefore, when I recently discovered that I could purchase digital scrapbooking kits from commercial designers and then load them into my Creative Memories Storybook Creator Plus 3.0 software, I was delighted.
Most of the time, I have not encountered any problems. I HAVE discovered one little fly in the ointment, though, that I finally figured out how to work around. Now let me just say right up front that I'm not a Creative Memories consultant. I'm just a long time user of Creative Memories products. Nor am I particularly computer savvy. I use the computer a lot but the Commander (a techno-wiz) has spoiled me rotten. If I have a computer problem, I just have to bat my baby blues at him and he comes right to my rescue. This can be a good thing and a bad thing; good in that I never get into computer glitches (except for the occasional hardware failure) that the Commander can't get me out of and bad in that I get lazy and don't make myself learn how to do these things for myself.
Anyway, the occasional annoyance that I've found with adding commercial digital kits to Storybook Creator is that sometimes designers group elements together into one "page", instead of making them individual elements. For example, in the photo above, this designer put the entire alphabet set into one .png. Now maybe there is an easy way to get each letter apart and saved individually but I haven't figured it out. So here is the work-around solution that I came up with.
I first create a new project in Storybook Creator and make it a blank 12 x 12 page. Then I open up the designer package that I want to work with. Looking at the right side of the SC screen, I click on "Embellishments" and scroll down until I find the set of embellishments that I want to separate. In this case it was an alphabet set. I dragged that set over to my blank page.
Now at this point, you have several options, depending on the actual graphic. For quite a few alphabet sets, sets of brads, sets of frames, etc., I was able to follow the procedure below:
1. "Select" the whole set of elements on your blank page.
2. Click on "Cut and Fill" on the Home Ribbon. Then click on "Wand."
3. Click with the Magic Wand on an individual element within the set of elements on your page (adjusting the color sensitivity and intensity sensitivity of the Magic Wand, as needed).
4. Once the moving dots have selected it to your satisfaction, then click on "Copy the selected Area." You should see that particular individual element now pop up in your Elements panel on the left of your screen.
5. Now click anywhere on your working page where you haven't already been working to "select" all of the elements again, and repeat steps #2 through 4. Do this step each time that you've finished copying an element until you have made a copy of each element individually.
6. Now you need to go to your Elements ribbon at the left of the screen. Click on the right of one of the elements you just copied. You'll see a drop-down arrow. Click on that arrow and then choose "Save as Content."
7. In the photo above, it shows the window that will pop up. You want to choose what package you want to save that element in. In my Content Manager, I've created a folder called Blog Packages and in that I've created individual User Content Packages for each commercial digital kit that I've purchased. So when I want to save elements I've created from a set of elements from one of these kits, I "save" each one to the designer's content package that the set originally came from. I choose "embellishment" as the "type". Then I type in a name for the element I'm saving (it can be any name you want, such as "UpperA") and click on Save. I don't mess around with any other settings on that window, such as size or pixels. It automatically defaults to save it as a .png file, which is what I want. Repeat this step for each element you've copied.
8. Once you've finished saving all of your copied elements into your content package of choice, I go back to my Element Ribbon once more and click on the right of each element once more and this time I choose "delete." I do this for each one until I end up with a blank page, ready for me to work with the next set of graphics that I want to separate. It's tedious, but it works and once you've done this, you don't have to repeat it again because these elements are now saved permanently as individual embellishments in your designer kit within Storybook Creator.
Now suppose you have a set of graphics that you just can't get the Magic Wand to select properly? In the case of the alphabet set at the left, I just couldn't get the wand to give me a good copy of the whole element. So I ended up following the same procedures I outlined above EXCEPT that I used the Shape feature in the "Cut and Fill" section of my Home Ribbon.
I looked through the "Geometric" shapes and found "Ellipse." I choose this and then manipulated it until it was the same size and shape as the individual oval within the set that I wanted to save. Then I just placed my shaded ellipse over the element and followed steps 4-8 above. The only difference is that as I'm ready to go on to the next letter, for example, I "select" the entire page and then click on "Shapes" and the oval shape that I already worked on to get to just the right size will show up on my page and then I just have to move it over the next letter or number that I want to copy. There is no need to resize the Ellipse each time.
You can see my newly saved individual elements are now showing up in the Embellishments Panel on the "Content" side of my screen.
There you have it.....my technique to make individual elements out of those pesky grouped graphics. There might be an easier way out there but this one works for me and it certainly makes time fly. Plus I can guarantee you that you will become much more comfortable working with Storybook Creator Plus as you do all of this. Good luck!
Most of the time, I have not encountered any problems. I HAVE discovered one little fly in the ointment, though, that I finally figured out how to work around. Now let me just say right up front that I'm not a Creative Memories consultant. I'm just a long time user of Creative Memories products. Nor am I particularly computer savvy. I use the computer a lot but the Commander (a techno-wiz) has spoiled me rotten. If I have a computer problem, I just have to bat my baby blues at him and he comes right to my rescue. This can be a good thing and a bad thing; good in that I never get into computer glitches (except for the occasional hardware failure) that the Commander can't get me out of and bad in that I get lazy and don't make myself learn how to do these things for myself.
Anyway, the occasional annoyance that I've found with adding commercial digital kits to Storybook Creator is that sometimes designers group elements together into one "page", instead of making them individual elements. For example, in the photo above, this designer put the entire alphabet set into one .png. Now maybe there is an easy way to get each letter apart and saved individually but I haven't figured it out. So here is the work-around solution that I came up with.
I first create a new project in Storybook Creator and make it a blank 12 x 12 page. Then I open up the designer package that I want to work with. Looking at the right side of the SC screen, I click on "Embellishments" and scroll down until I find the set of embellishments that I want to separate. In this case it was an alphabet set. I dragged that set over to my blank page.
Now at this point, you have several options, depending on the actual graphic. For quite a few alphabet sets, sets of brads, sets of frames, etc., I was able to follow the procedure below:
1. "Select" the whole set of elements on your blank page.
2. Click on "Cut and Fill" on the Home Ribbon. Then click on "Wand."
3. Click with the Magic Wand on an individual element within the set of elements on your page (adjusting the color sensitivity and intensity sensitivity of the Magic Wand, as needed).
4. Once the moving dots have selected it to your satisfaction, then click on "Copy the selected Area." You should see that particular individual element now pop up in your Elements panel on the left of your screen.
5. Now click anywhere on your working page where you haven't already been working to "select" all of the elements again, and repeat steps #2 through 4. Do this step each time that you've finished copying an element until you have made a copy of each element individually.
6. Now you need to go to your Elements ribbon at the left of the screen. Click on the right of one of the elements you just copied. You'll see a drop-down arrow. Click on that arrow and then choose "Save as Content."
7. In the photo above, it shows the window that will pop up. You want to choose what package you want to save that element in. In my Content Manager, I've created a folder called Blog Packages and in that I've created individual User Content Packages for each commercial digital kit that I've purchased. So when I want to save elements I've created from a set of elements from one of these kits, I "save" each one to the designer's content package that the set originally came from. I choose "embellishment" as the "type". Then I type in a name for the element I'm saving (it can be any name you want, such as "UpperA") and click on Save. I don't mess around with any other settings on that window, such as size or pixels. It automatically defaults to save it as a .png file, which is what I want. Repeat this step for each element you've copied.
8. Once you've finished saving all of your copied elements into your content package of choice, I go back to my Element Ribbon once more and click on the right of each element once more and this time I choose "delete." I do this for each one until I end up with a blank page, ready for me to work with the next set of graphics that I want to separate. It's tedious, but it works and once you've done this, you don't have to repeat it again because these elements are now saved permanently as individual embellishments in your designer kit within Storybook Creator.
Now suppose you have a set of graphics that you just can't get the Magic Wand to select properly? In the case of the alphabet set at the left, I just couldn't get the wand to give me a good copy of the whole element. So I ended up following the same procedures I outlined above EXCEPT that I used the Shape feature in the "Cut and Fill" section of my Home Ribbon.
I looked through the "Geometric" shapes and found "Ellipse." I choose this and then manipulated it until it was the same size and shape as the individual oval within the set that I wanted to save. Then I just placed my shaded ellipse over the element and followed steps 4-8 above. The only difference is that as I'm ready to go on to the next letter, for example, I "select" the entire page and then click on "Shapes" and the oval shape that I already worked on to get to just the right size will show up on my page and then I just have to move it over the next letter or number that I want to copy. There is no need to resize the Ellipse each time.
You can see my newly saved individual elements are now showing up in the Embellishments Panel on the "Content" side of my screen.
There you have it.....my technique to make individual elements out of those pesky grouped graphics. There might be an easier way out there but this one works for me and it certainly makes time fly. Plus I can guarantee you that you will become much more comfortable working with Storybook Creator Plus as you do all of this. Good luck!
Thursday, December 18, 2008
In Defense of the Christmas Newsletter

Well, I'm done with the annual Christmas newsletter. The cards have all been addressed and stuffed and are in the mail. That's always a chore that I'm happy to see to completion because the whole shebang has a tendency to take over our dining room table and my free time until it's done.
I used to try to write a handwritten note in each card in addition to including our newsletter but have finally decided, in the interest of expediency and my sanity, that the newsletter is enough. My mother would groan at this since she always insisted that you had to write "the note" but I'm breaking free from that expectation. "I'm not writing the note, Ma!"
Speaking of my mom, it was always a BIG production at our house when I was growing up as my mother would try to get the Christmas cards out on time. Inevitably, they'd make it into the mail by Easter. It's because she had to write in every card, you see. First Mom would agonize over writing her newsletter. She wanted to make sure that no one was left out in the mentions no matter how insignificant a part they had played in our year. Then she'd want to make sure that her grammar was "spot-on." Once I could type, she'd keep me busy for weeks typing up the rewrites. When the time finally came to address the cards, we'd all gather at the dining room table and form an assembly line. Whoever had the neatest handwriting would address the envelopes. Mom would reread her notes and then pass the card to the newsletter folder and stuffer . That person would neatly fold the newsletter and place it inside the card. It was then passed on to the envelope addresser who put the card into the envelope, licked the back flap and sealed it. Finally it was handed to the stamp licker who licked the stamp and placed it neatly in the upper right-hand corner and then gave it a good pop with their fist. No one wanted to be the lickers but since there were only four of us, two always got stuck with those tasks and usually ended up green around the gills because Mom typically sent out 200 - 300 cards every year. God bless the Post Office for inventing peel-off stamps.Despite my early memories of the family newsletter, I've been sending out my own Christmas newsletters ever since I left home. I like doing them and it has become fun for me
to see how I can come up with different and creative ways to get out the news to family and friends. This year, in addition to our newsletter, I made up two photo collages using my Storybook Creator photo editing software and sent them off with the cards. I think it's always fun
to see how other folks have changed over the year.....to see how their kids have grown up. I don't care whether the photos are xeroxed onto a newsletter or actual photos. I just enjoy them either way.
I know that there are people who deplore getting Christmas newsletters. Let me just say that I am not one of them. I love opening up a Christmas card and seeing a newsletter tucked inside full of all sorts of events that have taken place in folks' lives over the past year. For many, that's the only contact I have with you each year, simply because you've moved out of the area or live too far away to visit and your lives are too busy to write or call on a regular basis. This is my chance to stay connected with you. It is so disappointing to open a card from a friend or relative who lives far away and only see a signature. I'd almost rather not get a card at all.
So I'm begging you all.....do that Christmas letter this year. It doesn't have to be handwritten. Typed up on the computer and printed off and copied is fine. The important thing is that it contains news of what you've been up to. And if you want to email it to people instead of mailing it, that's fine, too. Either way, you're moving beyond the cursory and sharing a part of yourself this Christmas season. And if your letters are late and don't make it out until Easter? Hey, you'll just be increasing my joy this Easter season.
Monday, November 17, 2008
Awash in Paper No More
Last weekend I met my daughter, Laura at a local motel for a Fall Scrapbooking Retreat. We joined a group of diehard scrapbookers on Friday afternoon and scrapped our little hearts out until Sunday afternoon. I love these retreats because I get to see so many of my friends AND I can get so much done. We have a room reserved just for our scrapbooking where we can leave our supplies and projects out 24 hours a day and come and go as we please to work on them as we will. Some folks stay up scrapping into the wee hours of the morning. (I made it to 2 a.m. the first night.) Others are much more sensible and rise and retire according to a more normal schedule.
I tried a new experiment at this retreat. Instead of lugging all my supplies over to the motel, I decided to spend the weekend doing digital scrapbooking on my laptop computer. Consequently, I really only needed to bring my laptop, some extension cords, my small external hard drive, and my wireless mouse. My daughter scrapbooked the more traditional way, bringing her albums, paper, adhesive, trimmers, etc. Oh, that's my almost 60-year-old bear, Elizabeth supervising things (or trying to).
So compare the work area shown in the photo at the right with the photo on the left, which is my work space. It was just me, my computer, an idea book or two, and occasionally, Elizabeth.
I'm telling you, it was great. I'd work on my digital albums and pictures and, when I'd get tired, I'd read my email or surf the Net. If I needed to refresh my memory on some place I'd toured for a bit of journaling, I'd go up on the Net and Google the attraction to doublecheck things like "what year was Edgewood Plantation built?"
Occasionally I'd get up to stretch my legs and wander around to see what others were working on
or I'd go grab another cookie from the snack table to keep my energy levels up. Elizabeth contented herself with checking out the new products on the display tables. I'm amazed at the options that we now
have with Creative Memories for either the traditional scrapbooking or downloading the same paper designs or embellishments for digital scrapbooking. The digital versions sure solve the storage problems in my craft room, making more space for all my yarn.
or I'd go grab another cookie from the snack table to keep my energy levels up. Elizabeth contented herself with checking out the new products on the display tables. I'm amazed at the options that we now
have with Creative Memories for either the traditional scrapbooking or downloading the same paper designs or embellishments for digital scrapbooking. The digital versions sure solve the storage problems in my craft room, making more space for all my yarn.
By the end of the weekend, I was amazed that I had spent so many hours on the computer and accomplished so much without feeling at all wiped out. Even better, it only took me about 5 minutes to pack up everything. Whee! Now the test will be to compare costs over the next few months to see if digital costs are comparable to traditional and also to see if I'm staying more up-to-date on my scrapbooking by going digital.
Wednesday, April 16, 2008
My Name is Dee and I'm a Perfectionist!
I've been feeling a tad unappreciated lately. Here I've sat, practically chained to the computer while working away on my daughter's wedding pictures and all I've heard is "Aren't you done with those pictures yet?" I had hoped that I would feel the joy spreading up from the D.C. area as my dear child thought of me slaving away, taking such great care to edit her pictures so precisely but the only thing I've been feeling is my hips spreading from all this sitting.
I suppose I could have just whizzed through the 600+ photographs and only taken the time to edit out the red eyes from people but that isn't how I operate. You see, I'm a perfectionist. If I'm going to do something, I want to do it right, as in "suck in your breath, would you look at this, hold on to your hat, Martha, you ain't ever seen anything like THIS before, it's better than anyone on the face of the planet could have done it," right.
Now, I could have left this picture just like this and most couples wouldn't have minded at all. But a perfectionist would have looked at this picture and heard that phone in the background ringing every time they looked at it. Who in the world puts a phone on the front of a choir railing? Does the choir director call the sound booth in the middle of the service if the music doesn't start on time for the anthem and say, "Hey, could you cue up the tape already?" No, that phone had to go. So I used my handy little Creative Memories photo editing program and in a matter of a few minutes, the photo now looked like the one on the left.
No phone! Much less distracting, wouldn't you agree? But I haven't been stopping with just phones. Oh no! I've been taking out distracting microphone cords dangling from the ceilings above the wedding party. I've been erasing huge and unsightly speaker boxes from the walls behind the family photo groupings up on the stage. If people in the photos have had eyes glowing as red as embers, looking like they're possessed by who knows what, I've given them back their normal eyes. If they've happened to be wearing contacts, I've even given them back pupils where before they had opaque white circles staring back at the camera.
If everyone looked good in a photo except for one or two whose eyes weren't open, I've been examining the photo to see if there was some element that I could save out of it. For example, in the photo on the right, our groom has his eyes shut. But it is a really nice picture of the bride and her father. So I just cropped out the groom and myself and left in the two on the left. I had to do a little "erasing" of the groom out of the cropped picture but I can do that with the miracle of the cloning tool in my editing bag of tricks.
Gone is the groom (temporarily) and now we have a nice shot of the bride and her dad. But I didn't just whip that up in two seconds. That took a little time.I'm also doing things like sharpening the focus when the pictures are fuzzy. Sometimes I'm purposely blurring the background when there is nothing in the background of note so that the bride and groom will really stand out, or in today's terms, so that they will "really pop." I'm assessing the colors and adjusting color temperatures as needed or changing shadows, highlights, contrasts to bring out the best in each picture. Sometimes I'm even taking off double chins.
My son-in-law is NOT prone to having double chins. He's in fine shape, works out and has muscles in all the right places, according to my daughter. But anyone, when tilting their head
in a certain way and looking down, will end up with a double chin. Just think back to some of your drivers license photos. I knew that I could remove that extra chin and I decided to do it. Why not? Wouldn't you want to look your best in your wedding photos? Some day when your skinny son is looking at your wedding pictures and you are 30 pounds overweight and he says to you, "Hey, Dad, is that REALLY you?" , don't you want to be able to say, "Yeah! Looked pretty good, didn't I?" You betcha! So now, here's the happy couple after a little help from Mom.

in a certain way and looking down, will end up with a double chin. Just think back to some of your drivers license photos. I knew that I could remove that extra chin and I decided to do it. Why not? Wouldn't you want to look your best in your wedding photos? Some day when your skinny son is looking at your wedding pictures and you are 30 pounds overweight and he says to you, "Hey, Dad, is that REALLY you?" , don't you want to be able to say, "Yeah! Looked pretty good, didn't I?" You betcha! So now, here's the happy couple after a little help from Mom.
I did contemplate trying to shave off about 4 inches from my hips in some of the pictures but couldn't quite figure out how to shave off a comparable amount from my torso so had to resist the urge and move on to other challenges.
So when my daughter says, "Mom aren't you done with those pictures yet?", she should remember that creative genius can't be rushed. I am a perfectionist and I'm going to take the time to do it right.
Maybe it would help if I put it in terms that she would understand. OK, here goes. NOTE TO MY CHILDREN: Do NOT rush me! I have editing tools and I know how to use them.

Friday, September 01, 2006
Reeling in the Years
Well, the Summer Scrapbooking Challenge is finally over and I am happy to report that I finished the challenge with 303 pages completed. What a ride it has been! I did a heritage album of my mother's side of the family from my Gr.Gr.Gr. Grandmother up to my mother. I scrapbooked my mother's life up to her present day at 92 years young, I started my own heritage album and have just gotten through my Army years, and I finished the heritage album of my father's life.Speaking of my father, it's been a bittersweet time. Dad died while I was on my honeymoon almost 27 years ago. He never met my husband although he did talk to him over the phone when George called him from Greece to ask for permission to marry me. We had planned to redo our vows back home once we rotated back to the States so that our parents could attend the ceremony but that wasn't to be.
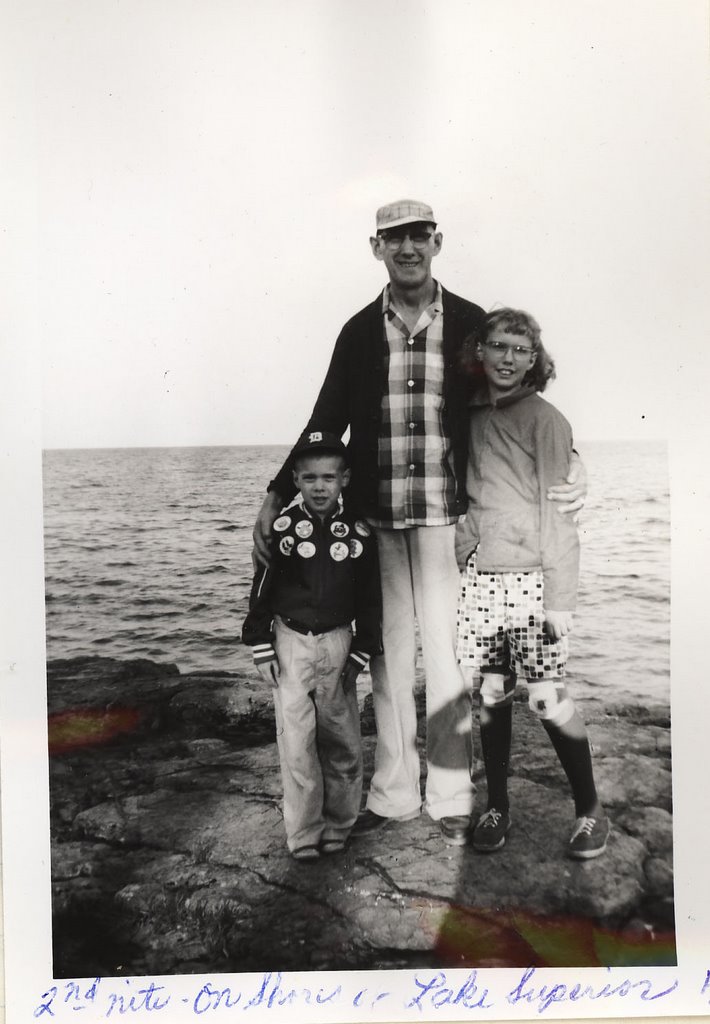
Putting these old pictures into a scrapbook and writing down all the old stories has been very emotional for me. I've been reliving all these memories. Take this picture, for instance. My brother and I are posing next to Lake Superior while we were enroute to the farm in Minnesota. Notice the bloody bandages on both of my knees. With my usual grace, I had decided to run down a hill at a rest stop to get to the car and had lost my footing, skidding down the remainder of the hill and across half of the parking lot. Ouch! I still bear the scars on both knees. When I look at that picture and when I read the journaling about it, I can remember that day so clearly.
I think people still throw pictures in albums but not many write down the stories these days. We need to do that, even if it is writing it up on the computer and then printing it off and sticking it in your album. Every culture has had its storytellers. In early cultures, that's how they passed on the group memories and traditions. In our extended families, someone has to be the group storyteller because the older generations are passing on and as they do, many of those wonderful stories are being lost forever.
So I've spent some enjoyable time with my dad this summer, I've caught glimpses of my mom in college, and I've relived the triumphs of my college theatrical career, all through the combination of scrapbooking and memories. Not a bad way to spend the summer, if I do say so. But I must admit, after 303 pages completed.....I'm taking a break for a few weeks to do some knitting, crocheting, and looming.
Saturday, August 05, 2006
Walking Down Memory Lane
Our scrapbooking consultant has a summer scrapbooking challenge every year. We're encouraged to set a goal for ourselves of a certain number of pages that we think we can finish scrapbooking and then we work on our pages independently over the summer. At the end of the summer months, we report the number of pages we completed, journaling and all, and have a big scrapbooking party where the winner is announced, drawings are held, and food is eaten (of course).This year I decided to set a goal of 100 pages. Being the over-achiever that I am, I've already finished 183 pages since the middle of June and am still going strong. I started the summer working on a heritage album for my mother's side of the family and finished it (all except for my grandfather's side of the family). Then I started and completed a heritage album for my father's side of the family. Now I've started on my own childhood pages. I've worked my way up to my toddler years.
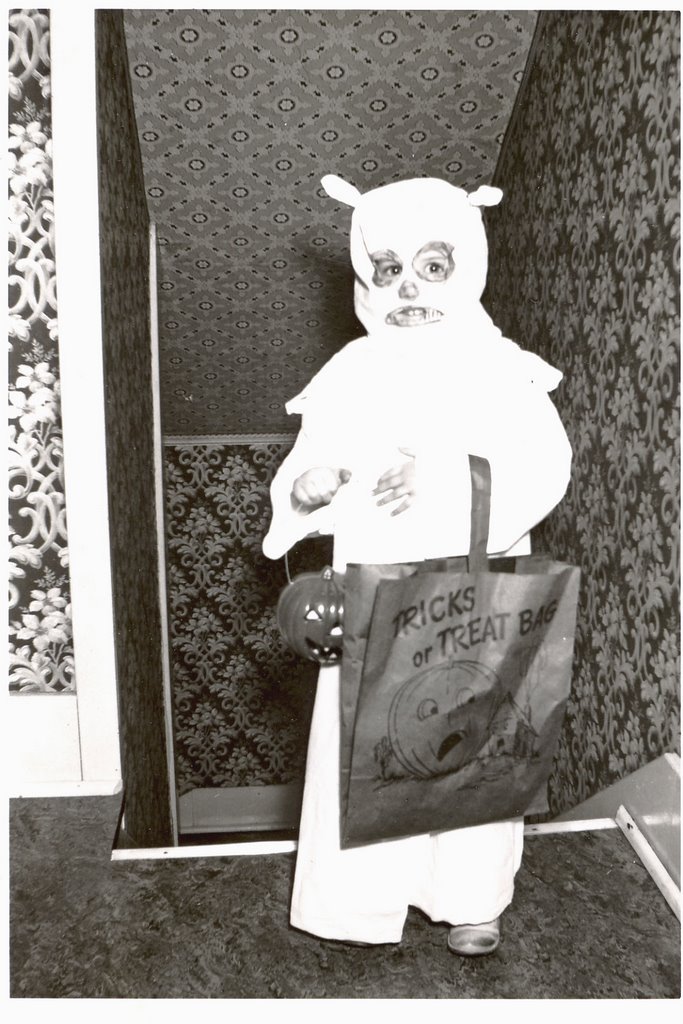
Having just come back from Michigan and working on my childhood home, I had to laugh when I saw this picture of me in full Halloween regalia. It wasn't the costume that made me giggle. It was the horrid wallpaper. You see, my folks ended up painting over the wallpaper in the hallway leading up the stairs to the second floor. It's now a putrid green color. But get a load of the wallpapered ceiling in a DIFFERENT print from the busy wallpaper of the side walls. We had caught a glimpse of this wallpaper this summer when we removed a picture from the wall and saw where the paint had worn away and you could see about a 5-inch section of the original wallpaper. Whoever buys the house will have quite a job whether they decide to strip the walls and repaint or repaper.
Going through these old photos certainly brings back the memories. I'm often reminded of one of my favorite moments in the movie "Peter Pan" with Robin Williams. At one point, a grown up Peter Pan is faced by Tinker Belle, who can't quite believe that this OLD fellow is her beloved young boy, Peter. She goes up to him and pulls the skin of his face back tightly, looking deep into his eyes. "It IS you, Peter," she cries. I think about that many a day as I stand in front of the mirror.....pulling back the jowls and the wrinkles around the eyes to try to catch a glimpse of the young girl that I know is in there somewhere.
Our son, Jason, was recently looking through Mom's heritage album. "This is scary,", he said.
"What is?", I asked.
"Grandma looked just like a teenager back then," he replied. "If she could look like that and now look so old, it could happen to me, too."
Ah, age. The great leveler of us all!
Subscribe to:
Posts (Atom)